 Create some cool smooth chrome with soft blue highlights, great as a text effect or on all kinds of other... eh, chrome stuff.
1. This technique can be applied either to text or any other "thing" you'd like to add some cool chrome to. For the purposes of this tutorial, I'll be using text in my example, however feel free to apply the technique to any other shape.
Begin by creating a new image 500x500 px with a dark gray background. Set your foreground color to white and use the Type Tool to create whatever text you'd like to use - make it as big as possible (the example uses the Times New Roman font). Next choose Layer » Type » Render Layer. After that's done, hold CTRL and click on the text to select it. Now go to the Channels palette and create a new channel.

2. On the new channel fill the selection with white, then deselect (CTRL +D). Go to Filter » Blur » Gaussian Blur, and use a radius of 8. Repeat Filter » Blur » Gaussian Blur, this time using a setting of 4. Again, Filter » Blur » Gaussian Blur and enter 2. Aaaaannnd, you guessed it... once more Filter » Blur » Gaussian Blur and enter 1. When you've completed this, go back to the Layers palette and click on the type layer.
Note: If your font is very "thin" overall, you may get a bevel in the following step that looks too rounded - if that's the case, consider using lower values during the multiple-gaussian-blur step (such as beginning with 6 or 4 instead of 8).

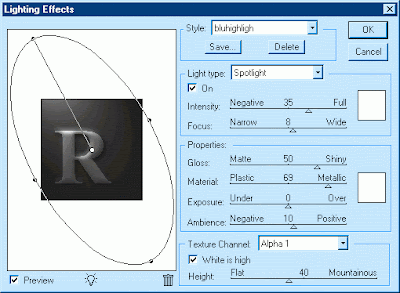
3. Now with the type layer active, go to Filter » Render » Lighting Effects and use these settings.
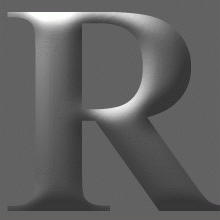
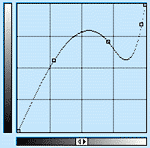
4. Next go to Image » Adjust » Curves and match your settings with those in the example below... by this point things should be starting to look a lot more like chrome. You can, of course, alter the curves as you wish, as long as you're happy :)
If you're having trouble getting it right, here's a Curves setting file I've made, similar to the example, that you can load to give you the right starting point. Download this file and unzip it, and in the Curves dialog box, click Load and select this file.
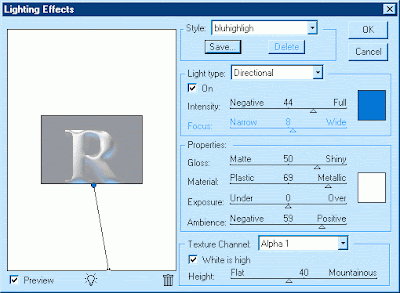
5. Now that the chrome is all set, it's time to add the highlight. Go to Filter » Render » Lighting Effects and use these settings.
6. That's it - just resize your type down to about half the size and add a drop shadow.


No comments:
Post a Comment